Category Archives: sewing

Having an Etsy shop is addictive

I’ve been to a few knitter gatherings around town lately, and finally ran into Kristin of Craft Leftovers.com.  I found her site a while back, have chatted  with her through Ravelry to get the inside scoop on fiber activities in Ames, and had heard about her from others, but we hadn’t met until a couple weeks ago.

At that point, I had just started working on my Etsy shop, had maybe 3 items listed and hadn’t sold anything yet.  We were talking about Etsy and she warned us to “Watch out, Etsy is addictive”.  I was skeptical at the time, but now I see why.

It is such a thrill to get an e-mail in my inbox telling me someone has purchased my creation.  It has made me want to make more, make them better, come up with other products and generally spend all my time in my craft workshop.  A few sales was all the encouragement I needed to start a full time obsession.  In general, I’m as happy as I can remember being in a long time.  Even though Scott has to work such long hours and goes back to work after dinner every day, being busy makes being alone a lot less lonely.

I’d say I should have started this earlier, but this is the first time we’ve moved in 10 years that we don’t think we’ll be moving again soon.  Having time and space to develop something counts for a lot.

I’m very thankful for the sales I’ve had so far, and it has driven me to list new items.

Shameless promotion time:

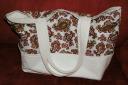
A notions pouch in black, white and red paisley.

An organizer set for hat and mitten sized DPNs

And my newest set:

The Sock Knitter Set which includes 6 dpn holders, cards for recording sock recipients’ foot measurements in a custom holder with grafting instructions on back, a stitch marker holder and a work in progress (WIP) holder.

I think next I may change gears and work on another holder design, rather than stocking the shop.  Or I may just make another one of each of these in a different fabric.  I guess it depends on if the creative juices are flowing, or I’m in a production mode.  The flexibility of a little online shop really suits my work style. 🙂

I think I’ll end this rambling post, but heed this as a warning: Etsy Shops are addictive!

A little update…

I don’t have much to show this time, since I’ve been busy making Mother’s day Gifts, but I did manage to make a replacement case for my knitting notions.  The one I purchased as a set from Clover when I first started knitting was looking pretty ragged and allowing things to fall out.

I’d been wanting to try sewing with vinyl for a while, and when I saw a remnant at Walmart for 85 cents, I decided to try.  Working with vinyl is a little tricky, since you can’t pin it and it tends to stick to your sewing machine.  But with one rework to use wider bias tape on the sides of the bag, it worked out pretty well.  The zipper is the most expensive part.  🙂

notions case

In other news, we are headed down to Baltimore to see Scott’s brother and sister-in-law and go the the Maryland Sheep and Wool Festival.  It looks like a big event with 250 vendors and lots of sheep competitions.  It should be a lot of fun, even if it rains.  They even have a “Sheep to Shawl” contest that starts with shearing and ends up with a complete knit shawl.  I don’t know how long that takes, but they start Sunday morning, so it can’t be more than 1 day.   I think it would be a rather exhausting day, to say the least.

I’ll do my best to take pictures and post an update when we get back.

One last thing:

I got a comment from Vanessa on my Cotton Crochet Cloche pattern about adjusting the size for her daughter.  Since I was editing the pattern anyway, I’ve gone ahead and posted a 14″ head version and an 18″ head version for infant and child. They are tabs on the same spreadsheet.  Just look for the links in the upper left hand corner of the page.

Not knitting, but FOR knitting

So until today I had not been knitting a lot recently, but I have been sewing.

I finished a second knitting bag using my instructions and adding a zipper pocket that I kept wishing the original bag had. This time I’ve taken pictures and am working on proper sewing instructions with photos that should be a pdf on my blog in the next week or so.
finished knitting bag side view
knitting bag with zipper pocket

Today I’ve been knitting, since we were told that the water was going to be off in the apartment all day. I decided that I would probably like to use the bathroom at some point, so I went to work with Scott. With no computer access I got quite a bit of knitting done, not to mention that this evening was our Twisted Stitchers meetup night so I had another couple hours. I’m working on the ” 103-1 Jacket in Eskimo or Silke-Alpaca with A-shape and ¾-long or long sleeves” from DROPS design using RYC Soft Tweed.

Here’s the picture from the website, mine will be done in a week or so.
DROPS Design Jacket

A little bit of..

It has been a little while since I have posted, and I don’t have finished objects to show for it, but I will fill you in on what I have been up to.

I have been doing a little of this:
Elefuffle construction
Making another Elefuffle to verify the pattern and take pictures of the steps.

and this:
Fuzzy bookmark
Knitting swatches from the Barbara Walker Treasuries ( with my very fuzzy bookmark near by)

and using this
Rowan Yarn Company Soft Tweed
To make a new knit jacket (wip)
Jacket-WIP

and this:
Messenger bag prototype
Prototyping a messenger bag for knitting. I made my first zipper pocket in the lining of this bag using this tutorial.

and this:
Valentino's surprise birthday party
Dancing in a NYC club for Valentino’s birthday party ( he’s the one on the right). Valentino is Scott’s office mate and his wife really surprised him for his birthday. She had a Decoy party on Friday night to make him think that his birthday celebration was over. Then she managed to get him to the club where all of us were waiting. Not a very good picture, but it was 2 am, after all. We had a hotel downtown NYC for Sat. night, so we danced until about 2:30 and took a cab home. I could have danced ’til dawn, but Scott made a little too much use of the open bar in the first hour to last that long.

I also saw Larissa after her trip to AZ and she brought me this:
Yin and Yang yarn
Yin and Yang Yarn from Southwest Trading company. Ideas are marinating in my brain on the best way to use these. Until then, into my stash they go.

As you can see, I’ve been occupying my time with a variety of things, but haven’t had the determination to finish any of them.

I will finish them eventually, but until then,

Ciao.

Making the knitting bag

Here is a preliminary description of what I did to make my knitting bag. More detail and pictures may follow after the holiday. Best to read all instructions before starting.

I am definitely a novice seamstress, so use at your own risk. 🙂

Please comment or send me an email (sarah_beckman*at*yahoo.com)if you use this pattern, I would like to know what works and what is confusing. Feel free to ask questions, and I can’t wait to see other people’s bags.

Stellar Babble’s Knitting Bag

My knitting bag Inside the knitting bag

(18″ is the width dimension for the fabric)

ed: Requires 1.25 yd (or less depending on width of fabric) each of print fabric and canvas

I cut:

1 18″ x 27″ from both print and canvas

1 18″ x 14″ from both print and canvas (makes 4″ pockets on the outside, if you want them deeper, extend the 14″ measurement 2″ for every inch of pocket. Keep in mind that the bag is 10″ tall.)

2 18″ x 7″ from both print and canvas (makes 6″ deep pockets on the inside)

2 3″ x 20″ from canvas for handles – adjust length to your preference, just leave 1″ on either side for sewing to bag.

To make the outside of the bag:

  1. Sew the 18″ x 14″ pieces right sides together along just the 18″ edges with a 1/2″ seam. Turn, iron and sew 1/4″ from the edges just sewn.
  2. Fold this piece in half (print side together) so you have an 6.5″ x 18″rectangle. Iron crease as reference line. Open, measure 2.5″ on either side of center line and mark a line parallel to the center line ( I fold and iron there to make a line). Measure 3″ in from un-sewn edges and mark a line perpendicular to the center line on both edges. ( Between these lines is the width of your bag)
  3. Fold the 18″ x 27″ print piece in half with wrong sides facing to make a 14″ x 18″ rectangle. Iron crease as reference line.
  4. Open and align the center lines of the two pieces with right sides of print facing each other and pin together. You should have a 13″ piece of canvas ( backed with print) centered on a 27″ piece of print fabric. Sew along the marks on the canvas piece to attach the canvas to the print and make the bottom of the outside pocket and corner of bag.
  5. You should now have two pockets 4″ deep x 12″ long. Decide how many and what size pockets you want on your bag and sew the canvas to the print fabric as desired. (I made one more line perpendicular to the center line so that I had a 7″ and a 5″ pocket). (Keep in mind that you will have 2 2.5″ pockets on each end of the bag when it gets sewn up)
  6. Fold in half with canvas on the inside, align edges of canvas, and pin all layers together. Sew along the 14″ side seams with 1/2″ allowance.
  7. Iron the bag flat. (This is where I would probably cut 2 sided fusible interfacing in two 17″ x 10″ squares and attach to print fabric above the sewn line to help keep the lining in place later. But I haven’t done it, so it could be a complete failure.)
  8. Now fold the bag so that the side seam and center fold are aligned and make a mitered corner 2.5″ deep. If everything went well, the lines that hold the pocket on should cross at the corner of the miter. See this tote-bag tutorial for a picture of the mitered corner. Sew across the corner ( should be 5″ across) to create the width of the bag.
  9. Turn right side out, iron as needed, and set aside.

To create the lining:

  1. Sew one 18″ x 7″ print and one canvas piece right sides together along just the 18″ edges with 1/2″ seams. Turn, iron and sew 1/4″ from the edges just sewn. Repeat for the other two 18″ x 7″ pieces.
  2. Measure 3″ in from un-sewn edges and mark a line on each edge of both the 18″ x 6″ pieces.
  3. Decide the size you want your pockets to be and mark those lines as well.
  4. Fold the 18″ x 27″ canvas piece in half with right sides facing to make a 14″ x 18″ rectangle. Iron crease as reference line.
  5. Open, measure and mark a line 2.5″ from the center line on each side.
  6. Align edge of 18″ x 6″ pieces, with print facing outward, on the 2.5″ lines on the right side of canvas. Pin in place.
  7. Sew the bottom of the 18″ x 6″ pieces to the canvas fabric
  8. Sew along the marked lines on the small pieces.
  9. Fold in half with pockets on the inside, align edges of pockets, and pin all layers together. Sew along the 14″ side seams with 1/2″ allowance.
  10. Repeat the corner mitering with the lining.
  11. Iron as necessary

Making the straps:

  1. Fold your 3″ x 2o” strips in half the long way.
  2. Sew one end and long open edge of one strip 1/4″ from edge. Repeat for second strip.
  3. Turn and iron the strips. Sew 1/4″ from each edge of the fold and hem. Repeat for second strip
  4. Sew a zig-zag down the center of each strip.
  5. Set aside.

Putting the bag together:

  1. Put the lining inside the bag, making sure side seams are aligned and mitered corners are on the bottom of the bag. (Pat from my knitting group (Twisted Stitchers- meetup.com) suggested cutting a piece of plastic canvas and placing it in the bottom of the bag between layers. I think this is an excellent idea. I would probably cut it 1/2″ smaller than the bottom rectangle, so that the bottoms could be stitched together.)
  2. turn it upside down, put something heavy in the bag, or otherwise ensure that the corners are aligned and the bottoms are touching. Pin in place.
  3. Although I didn’t do this until the end, this is probably the best time to sew the bottoms together. It is a tricky proposition, but I managed to sew over the stitching on the outside pocket that defines the edge of the bag in order to hold the lining to the bag.
  4. (If I had used interfacing, I would probably iron it now.)
  5. Fold the top edge of the outside and lining of the bag down aprox. 1″, so that the lining is even or slightly below the outside. Pin in place, leaving a gap for the handles.
  6. Measure 4″ in from the side seam and mark with pin ( 4 times).
  7. Insert strap 1″ deep between lining and bag, with outer edge at the 4″ mark.
  8. Pin strap in place.
  9. Sew bag lining and strap together by sewing around the perimeter of the bag 3/4″ from edge.
  10. Repeat, sewing 1/4″ from edge.
  11. Sew bag and lining together along 4 corners, from top edge to outside pocket to hold bag and lining together.
  12. For extra strength, you can sew a box with diagonals for each strap.

Put your knitting in it and take some pictures, you’re done.

I know this would be better with pictures and if I had more sewing experience, but hopefully, it gets you started.